VSCode创建编译CMake工程的一般流程
本文最后更新于:2022年5月29日 上午
这里总结一下在Ubuntu下使用VSCode创建编译一个CMake工程的一般流程,记录一下详细步骤。
Step 1:安装依赖
去VS Code自带的商店下载的插件,快捷键:Ctrl+Shift+X,下载各种依赖包:
- C/C++
代码提示和高亮、调试和代码文件关联跳转。 - C++ intellisense
自动代码补全;实时错误检查;代码改进建议。 - CMake
CMake语法提示和高亮、自动补全。 - CMake Tools
结合VSCode IDE使用CMake这个工具,比如生成CMake项目、构建CMake项目等。
Step 2:创建工程目录
建立一个cmake_ws文件夹(作为根目录):
1
mkdir cmake_ws进入cmake_ws文件夹,分别创建include、src和build文件夹,同时创建CMakeLists.txt文件:
1
2
3
4
5
cd cmake_ws
mkdir include
mkdir src
mkdir build
touch CMakeLists.txt建立完成后,结构如下图所示:

其中,include文件夹用于存放各种头文件,src文件夹主要存放各种源代码文件,build文件夹主要存放编译后的文件,CMakeLists.txt文件是编译文件,描述如何编译代码等。
Step 3:编写代码文件
进入src目录下,分别新建两个cpp文件:useHello.cpp和libHello.cpp,前者为包含main函数的主文件,后者为库文件,它们的文件内容如下。
useHello.cpp
1
2
3
4
5
6
7#include "libHello.h"
// 使用 libHello.h 中的 printHello() 函数
int main( int argc, char** argv )
{
printHello();
return 0;
}libHello.cpp
1
2
3
4
5
6
7
8
9
//这是一个库文件
#include <iostream>
using namespace std;
void printHello()
{
cout<<"Hello World"<<endl;
}
进入test/include路径下,新建一个libHello.h头文件,其内容如下。
1
2
3
4
5
6
7#ifndef LIBHELLO_H_
#define LIBHELLO_H_
// 上面的宏定义是为了防止重复引用这个头文件而引起的重定义错误
void printHello();
#endif
Step 4:编写CMakeLists.txt
例如:
1 | |
Step 5:各种json文件配置
在工作文件夹下面新建文件夹”.vscode”,然后在”.vscode”下面新建下面2个json文件并保存。
按F5,生成launch.json,修改为下面内容:
1
2
3
4
5
6
7
8
9
10
11
12
13
14
15
16
17
18
19
20
21
22
23
24
25
26
27{
// Use IntelliSense to learn about possible attributes.
// Hover to view descriptions of existing attributes.
// For more information, visit: https://go.microsoft.com/fwlink/?linkid=830387
"version": "0.2.0",
"configurations": [
{
"name": "(gdb) Launch",
"type": "cppdbg",
"request": "launch",
"program": "${workspaceFolder}/build/useHello", //useHello-在CMakeLists.txt文件里配置编译后生成的可执行程序名称
"args": [], //输入程序运行参数
"stopAtEntry": false,
"cwd": "${workspaceFolder}/build", //设置程序运行初始路径
"environment": [],
"externalConsole": true, //true-在外部终端运行程序;false-在软件内部终端运行程序
"MIMode": "gdb",
"setupCommands": [
{
"description": "Enable pretty-printing for gdb",
"text": "-enable-pretty-printing",
"ignoreFailures": true
}
]
}
]
}Ctrl+Shift+B→生成tasks.json,修改为下面内容:
1
2
3
4
5
6
7
8
9
10
11
12
13
14
15
16
17
18
19
20
21
{
// See https://go.microsoft.com/fwlink/?LinkId=733558
// for the documentation about the tasks.json format
"version": "2.0.0",
"tasks": [
{
"label": "make build",
"type": "shell",
"command": "cd ./build ;cmake ../ ;make", //编译命令
"group": {
"kind": "build",
"isDefault": true
}
},
{
"label": "clean",
"type": "shell",
"command": "make clean",
}
]
}
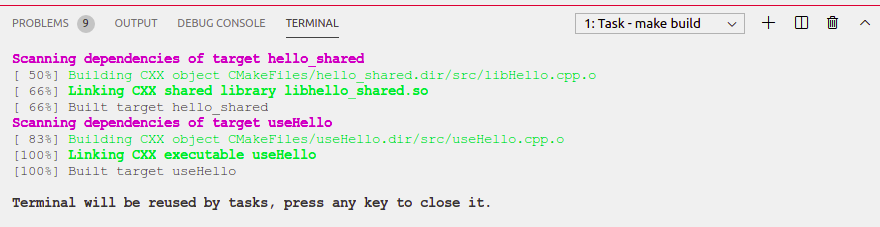
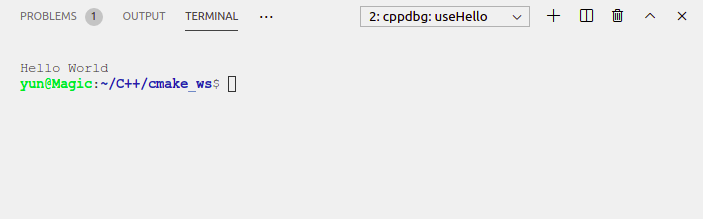
Step 6:执行
Ctrl+Shift+B 编译程序
F5 执行程序
Step 7:调试
在CMakeLists.txt文件中添加下面内容,即可通过断点进行调试。:
1 | |
参考链接
【1】https://www.icode9.com/content-3-518162.html
【2】https://blog.csdn.net/yinwenbin0805/article/details/103945958#t3